
Formatting layouts
It is important to note that in order to change the format of agenda and divider slides, these format changes have to be applied to the placeholders in 'edit layout mode'. The tool will apply the placeholder's formatting to the main agenda and all divider slides.
If format changes have been performed to the main agenda or to divider slides, then these will be replaced with the placeholders format when the tool is updating the agenda.
The formatting techniques are all standard PowerPoint features. Below, a few specific features are highlighted.
Video Tutorial

Interactive Tutorial
Here's an interactive tutorial
Step-by-Step Description
Step 1: Layout view

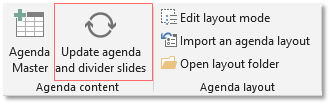
Click Edit layout mode on the ribbon menu
→ this is a 'toggle switch' for alternating between the normal view and edit layout mode
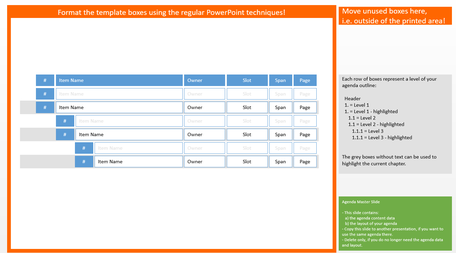
In 'edit layout mode', you will find placeholder boxes for each item of the agenda. The placeholder boxes can be selected individually.
They are organized into columns and rows and look like a table.
The top row is the header. Rows 2 & 3 are the placeholders for the first level of your agenda. Rows 4 & 5 are the second level and rows 6 & 7 are the third level.

Each of the three outline levels has two rows. One row displays the formatting for a regular agenda item, the other displays how it appears when that agenda item is highlighted. Formatting of the individual boxes will be applied to all items of the respective level.
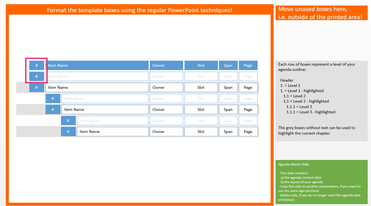
Step 2: Move unused placeholder boxes off the layout's printed area

Move items which you do not want to use off the printed area to the right hand, for example:
- the entire header row
- any of the optional columns (owner, slot, span)
- the blue or grey pointer shapes (boxes or circles )
Note: pointers ares shapes without text. They point like an arrow to the current section of a divider slide. Depening on your layout they can be circles in front of your agenda item text or a rectangle that lies under the whole row of your agenda item (like in this example here).
Step 3: Position the placeholder boxes
The placeholder boxes determine where your agenda table 's top left corner is on the actual slides, the width of the columns, the height of the rows and also the height of the space between rows:
- Top position of the agenda table on the slide is determined by the header row on the layout (if you do not use headers, then it is the first row)
- Row space: The distance between the header row and the first row will be applied to all other rows
- Left position of boxes will show on the slides as in the layout
- Size of the boxes (height and width) will show on the real slides alike
Nota bene: if your agenda runs over the botom of the page you have four options:
- Position the placeholders higher on the page
- Collapse more/all sub level items
- Adjust the height of the row space
- Adjust the height of the boxes (possibly decrease font size)
Step 4: Apply formats to the layout

Format the boxes using the regular PowerPoint techniques (e.g. fill, line and font color, font size)
Note: To apply your layout changes on the placeholders to the actual slides, you have to run <Update Divider Slides> again!

Depending on how your layout is formatted, you might want the main agenda to display items on the main agenda as highlighted or in regular format.
The checkbox allows you to either
- Unchecked: the format of the agenda items is regular
- Checked: the format of the agenda items is highlighted, like the highlight for the current chapter on the divider slides.
What is suitable depends on your respective layout. Try both options, if in doubt.